www.bestlinksUS.com
Learn the ropes on scanners and digitizing your old photos from LiveWire.
If you have "Photos" software built-in on your Windows 10 software, you can rescue your old, faded photos.First click on the photo you want to repair to Back it Up! Right-click on it and perform a "SAVE AS" to create another copy you will repair.
1 After saving the new copy, double-click the photo you want to repair. Windows should open Microsoft's "Photo" software screen and load your copy so you can edit it.
2. Wait a few seconds until your photo loads in the PHOTO viewer-editor.
Then click the EDIT icon at the top (shown at the left) to open the software EDIT tools to repair, crop or straighten your image. Or even changing the shape of your photo when you print it.
3. CROP OUT the wasted parts of your photo. Unless it's already perfectly composed with no wasted space on the edges, you'll want to grab the corners with your mouse to pull them in (like this example, where in the Crop tool's "Aspect Ratio" selecting "Custom",we're cropping out the whole right side of the
river! If you dont' choose "Custom" your aspect will change the size but not change the aspect shape of the original.)
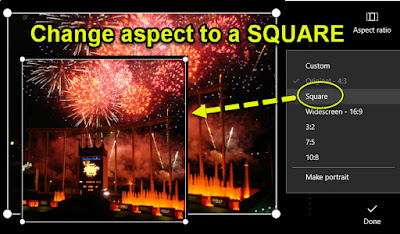
 Changing ASPECT will change whether to print square, wide, tall or a custom shape to print. (This example changes an oblong shape to a square.)
ROTATE will flip your picture SIDEWAYS, Upside down, or just TILT it very very slightly if it's scanned or originally shot crooked. Its easy to straighten crooked horizons with this tool.
Click DONE and then move next to the CROP/ADJUST tool.
Enhancing, adding/softening Contrast. This tool will bring your photo magically to LIFE if it's faded, too dark, too light, too fuzzy.
Click Enhance to auto-clean-up the picture.
Or click the manual Adjust button to add contrast to put some darkness in it to bring out the detail hidden in it.
The Light slider darkens or lightens your photo until your eye says it's just right.
The Color slider leftwards turns it to black-and-white or to the right, makes the color a bit more intense.
The Clarity slider sharpens edges and bring out detail or softens it for faces to remove skin blemishes. "Soften" brings out midtones, but "sharpen" makes edges more harsh. Find the middle appearance that suits you.
Only when satisfied with your repairs, SAVE as a final file name and location.
Not happy with your results? CANCEL or go back and start over with your saved original and copy it again!
Other editing tools
Other free software also has these edit features including the old Google Picasa, and software that comes with Nikon cameras, HP photoSmart scanners, and others.

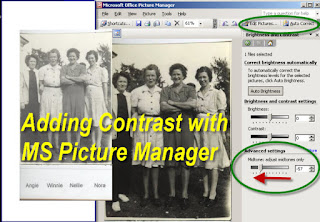
Microsoft Office's Picture Manager screen (Comes with earlier versions of MS Office). This is a very good example of adding contrast to brighten up a faded picture.
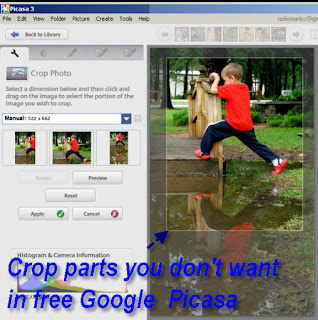
 If you have Google's old Picasa, crop out wasted parts to center our eyes just the good parts. (See how we want to CROP out all that empty grass at the bottom to center the picture only on the boy's action?)
That will also make what you have left larger!
You may find the controls at different screen locations in different software programs -- but most of them (crop, contrast, sharpen, etc) will be there somewhere.
About Enlarging...don't overdo it.
You can enlarge or heavily crop a large sized photo. It will handle it. Note that smaller photos may get very fuzzy if you push the size too much. You want good details, especially on faces!
For best results always select and save a higher quality, larger photo to your computer. (You can get better detail reducing a photo than enlarging it--by FAR!)
Practice, Practice! The more photo editing you do, the quicker you will improve your photos to save and share them for posterity!
Managing your computer's memory
Large graphic photos are memory hogs and eat up your PC's available filespace and memory quickly. Before starting your repairs of many photos in one sitting, reboot to free used-up memory so you can use it for your editing. Close all but the most necessary programs. Don't open excess windows to steal your available memory for your graphic repairs.
Assure your PC doesn't bog down as you repair several photos. If it does, save, close Windows and reboot your computer again. A 30-second quick reboot is like a full night's sleep; you want your PC fully rested and reset for this taxing process of loading, editing and saving pictures!

Back to Shooting Better Pictures


